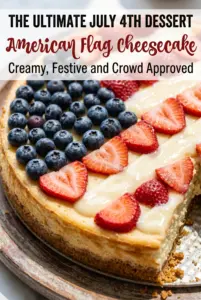
Silky cheesecake, a buttery graham cracker crust, and a clean flag design made from fresh berries turn this into the dessert people remember after the party ends. The texture is the part that keeps it in the rotation: dense and creamy in the center, with a crust that holds its shape instead of crumbling the second you slice into it. It looks festive, but it earns the right to be at the table because it eats like a proper cheesecake, not a decorated shortcut.
The baked filling stays smooth when the cream cheese is softened all the way through and the eggs go in on low speed, one at a time. That keeps too much air out of the batter, which helps prevent cracks and gives you a cleaner, more even set. The sour cream matters too. It softens the sweetness and gives the cheesecake that faint tang that makes each bite taste fuller.
Below you’ll find the little details that make the difference: how to press and pre-bake the crust so it stays crisp, how to cool the cheesecake without shocking it, and how to place the berries so the flag pattern looks neat instead of busy.
The cheesecake set up beautifully and didn’t crack, and the berry flag looked neat enough that everyone thought I bought it from a bakery.
Love the creamy baked cheesecake and fresh berry flag? Save this patriotic dessert for your next Fourth of July or Memorial Day table.
The Crust Needs a Real Press, Not Just a Mix
Graham cracker crusts fail when they’re treated like an afterthought. If the crumbs aren’t evenly coated with butter, the base turns sandy. If the crumbs aren’t packed tightly into the pan, the cheesecake can pull away from the edges and crack as it cools. The pre-bake matters too. That ten minutes in the oven dries the crust just enough to keep it from going soft under the filling.
Use the bottom of a measuring cup or a flat glass to press the crumbs into an even layer. Work them up the sides a little so the filling has a wall to cling to. The crust should look darker and feel set before you add the batter. If it still looks loose or dusty, it hasn’t baked long enough.
What Each Ingredient Is Actually Doing in This Cheesecake
- Graham cracker crumbs — These give the crust its classic flavor and sturdy texture. Fine crumbs pack more tightly than coarse ones, so crush them evenly for a cleaner slice.
- Unsalted butter — This is the glue that holds the crust together. Melted butter coats every crumb, and you want enough to make the mixture look like damp sand, not wet paste.
- Cream cheese — Full-fat cream cheese is the backbone of the filling. Low-fat versions tend to bake up looser and can taste flat, so this is not the place to cut corners.
- Sour cream — This adds tang and keeps the cheesecake from tasting heavy. If you need a substitute, use plain full-fat Greek yogurt, but expect a slightly sharper finish.
- Eggs — Eggs set the cheesecake as it bakes. Add them one at a time and mix on low so you don’t whip in too much air, which is one of the main reasons cheesecakes crack.
- Fresh blueberries and strawberries — Fresh berries hold their shape and color on top of the chilled cheesecake. Frozen berries leak juice and blur the design, so save those for another dessert.
Getting the Filling to Bake Evenly Without Cracks
Building the Batter Slowly
Beat the cream cheese until it’s completely smooth before anything else goes in. If there are lumps at this stage, they’ll stay in the finished cheesecake no matter how long you mix later. Add the sugar next, then the sour cream and vanilla, and stop to scrape the bowl often so nothing hides at the bottom. The batter should look thick, glossy, and uniform before the eggs go in.
Adding the Eggs Without Whipping in Air
Eggs should go in one at a time on low speed. High-speed mixing traps air, and that air expands in the oven, then collapses as the cheesecake cools. That’s when cracks show up. Mix only until each egg disappears into the batter, then stop. The batter will still look rich and pourable, not fluffy.
Knowing When to Pull It From the Oven
The center should still have a small, soft wobble when you take it out. The edges will look set and slightly puffed, while the middle moves like thick custard when you nudge the pan. If you wait until the whole surface is firm, the cheesecake will end up overbaked and dry at the edges. Cooling it slowly with the oven door cracked helps it settle without a sudden temperature shock.
Three Ways to Make This Flag Cheesecake Work for Your Table
Gluten-Free Crust Swap
Use gluten-free graham-style crackers in place of the regular crumbs and keep the butter and sugar the same. The texture stays close to the original, though some gluten-free crumbs are a little drier, so pack the crust firmly before baking. If your crumbs seem especially sandy, add another tablespoon or two of melted butter.
Dairy-Free Version
Use dairy-free cream cheese and a thick dairy-free sour cream alternative with a neutral flavor. The filling won’t taste exactly the same, but it can still set nicely if the substitute is meant for baking. Pick a brand that’s firm straight from the fridge, not a whipped tub spread, or the cheesecake will bake up too soft.
Make It Ahead for a Crowd
Bake the cheesecake a day in advance, chill it overnight, and decorate it the day you plan to serve it. That gives the texture time to firm up and makes the berry flag much easier to arrange on a cold surface. If you decorate too early, the strawberries can bleed a little and the stripes lose their sharp edges.
Storage and Reheating
- Refrigerator: Store covered for up to 5 days. The crust softens a little over time, but the cheesecake stays creamy.
- Freezer: Freeze the cheesecake without the berry topping for up to 2 months. Wrap it tightly, then thaw overnight in the refrigerator before decorating.
- Reheating: Don’t reheat cheesecake. Serve it chilled or let slices sit at room temperature for 15 to 20 minutes so the texture turns soft and creamy again without becoming greasy.
Answers to the Questions Worth Asking

American Flag Cheesecake with Fresh Berries
Ingredients
Equipment
Method
- Preheat the oven to 325°F (165°C). This temperature bakes a creamy center without over-browning the crust.
- Mix graham cracker crumbs, granulated sugar, and melted butter until evenly combined. The mixture should look like damp sand when pressed.
- Press the crust firmly into a 9-inch springform pan. Pack it tightly so the slices hold together.
- Bake the crust for 10 minutes, then cool completely. Cooling prevents cracks when the filling goes in.
- Beat the cream cheese until smooth. Scrape the sides so no lumps remain.
- Add granulated sugar and mix until creamy. Mix just until incorporated to avoid excess air.
- Blend in sour cream and vanilla extract. Stop when the batter is glossy and uniform.
- Add the eggs one at a time, mixing on low speed. Mix gently to keep the cheesecake from puffing and cracking.
- Pour the filling over the cooled crust. Spread it evenly to create a flat top.
- Bake for 55–65 minutes until the center is slightly set. The middle should jiggle a little when you tap the pan.
- Turn off the oven and cool the cheesecake gradually with the door slightly open. Let it sit about 15–30 minutes to reduce sudden temperature shock.
- Remove from the oven and cool to room temperature, then refrigerate for at least 6 hours or overnight. Chilling fully sets the texture for clean slices.
- Arrange fresh blueberries in the upper left corner of the cheesecake. Press lightly so they adhere to the surface.
- Create red stripes using sliced fresh strawberries across the remaining area. Overlap the slices to form clear stripe bands.
- Add whipped cream accents if desired. Pipe or spoon small dollops for a finishing touch.
- Slice and serve chilled. Use a sharp knife and wipe between cuts for neat edges.