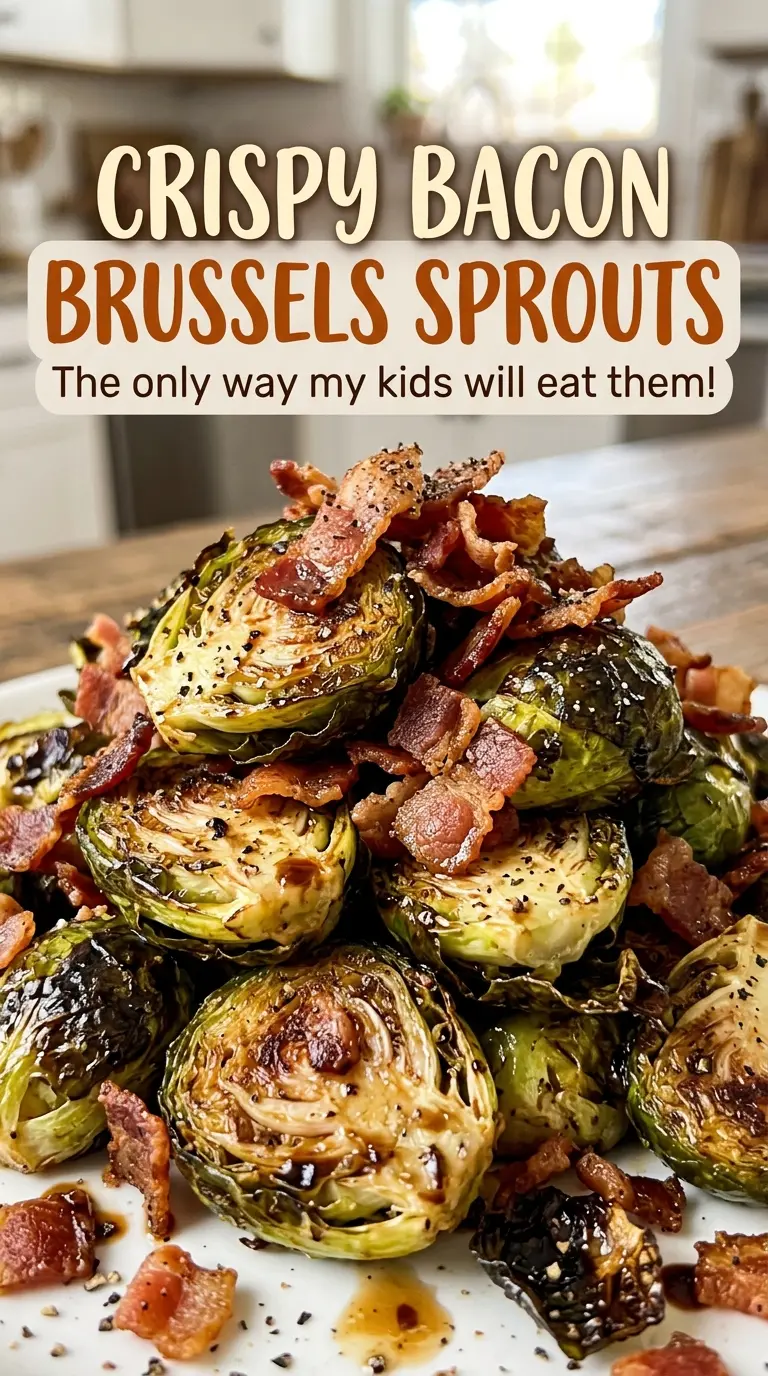
The bacon starts rendering as the sprouts begin to soften, and that timing is what makes this tray work: both finish together instead of leaving you with pale vegetables or dried-out bacon. I used to stir the pan too often, which kept the cut sides from staying in contact with the hot sheet long enough to brown. With Crispy Bacon Brussels Sprouts, a single turn halfway through gives the sprouts time to develop those deep golden edges.
The approach is straightforward, but the arrangement matters. Halved sprouts go cut-side down on a large rimmed baking sheet, with the thick-cut bacon scattered between them rather than piled on top. At 425°F, the bacon renders as the sprouts roast, adding savory richness while the exposed surfaces brown. You get tender centers, crisp bacon, and enough contrast in each bite to make a simple side feel complete.

Kitchen Note
Keep the bacon pieces close to the same half-inch size. Pieces that are cut unevenly won’t crisp at the same pace, and the smaller bits can get ahead of the sprouts.
Save these Crispy Bacon Brussels Sprouts for a side with browned edges, tender centers, and savory crisp bacon in every serving.
Why the Cut-Side-Down Position Makes the Difference
Brussels sprouts are compact, so the cut face is the broadest surface you have for browning. Set that flat side against the hot baking sheet and it gets direct contact instead of sitting above the pan on a rounded edge. Turn the halves cut-side up, or keep moving them around, and you interrupt that contact before the brown crust has time to form.
Room on the pan matters for the same reason. An 18×13-inch rimmed baking sheet gives the sprouts and bacon space to roast in one layer; when pieces overlap, moisture has nowhere to go and the vegetables soften before their edges color. Scatter the bacon among the sprouts, not in a blanket over them, so the cut faces stay exposed. The goal isn’t to coat every sprout in bacon drippings. It’s to give each half enough hot pan contact to brown while the bacon cooks alongside it.
That balance is what separates roasted sprouts from steamed-tasting ones. A dark patch on a cut face is welcome; a blackened edge isn’t necessary for tenderness. Keep the halves arranged flat when the tray first goes into the oven, then make the single planned stir after 15 minutes so the other surfaces can cook through.
What the Sprouts, Bacon, and Oil Each Bring to the Pan
- Brussels sprouts — Choose firm sprouts with compact leaves and no soft or yellowing spots. Fresh sprouts hold their shape as they roast and develop browned surfaces without turning watery. Trim them and halve them lengthwise so the flat sides can sit against the pan; very large sprouts may take longer to become tender than smaller ones.
- Thick-cut bacon — The thicker pieces stay meaty as their fat renders, bringing both crisp edges and a satisfying bite. A good-quality thick-cut bacon is worth choosing here, though a familiar grocery-store brand works well. Regular-cut bacon is a workable swap, but its thinner pieces crisp faster; see the variation below for how that changes the result.
- Olive oil — The oil helps the sprouts roast evenly and keeps the seasoning distributed across their surfaces. A basic olive oil is fine; a delicate, expensive bottle won’t make a noticeable difference once it goes into a hot oven alongside bacon.
- Kosher salt and black pepper — These season the sprouts without competing with the bacon’s saltiness. Kosher salt is specified because salt crystals vary in size; fine table salt tastes saltier by the same volume, so it isn’t a one-for-one swap. Freshly ground pepper gives a sharper aroma, but pre-ground black pepper is perfectly serviceable.
How to Roast the Sprouts and Bacon on One Tray
Heat the oven before arranging the vegetables
Set the oven to 425°F before you start building the tray. A properly heated oven begins roasting the sprouts as soon as the baking sheet goes in, which helps the surfaces brown instead of slowly softening. Use an 18×13-inch rimmed baking sheet so the ingredients can sit in a single layer. The rim also keeps rendered bacon fat from running off the pan.
Coat the halved sprouts evenly
Toss the trimmed, halved sprouts with olive oil, kosher salt, and black pepper right on the baking sheet. Turn the halves through the oil until their cut faces have a light sheen and the seasoning isn’t all sitting in one spot. If a few halves look dry, toss them through the oil already on the pan rather than adding extra. Keep the sprouts cut-side down once they’re coated.
Scatter the bacon without covering the cut faces
Arrange the sprouts flat-side down, then scatter the half-inch bacon pieces among them in one layer. Leave visible gaps between pieces; a crowded mound traps moisture and makes it harder for the vegetables to brown. The bacon should be distributed around the tray rather than stacked together in one corner. That spacing lets the sprouts and bacon roast at the same time.
Stir once, then roast until both are ready
Roast for 25 to 30 minutes, stirring once after 15 minutes. The sprouts are ready when they’re tender and their edges are browned; the bacon should look crisp, not merely pale and glossy. If the tray needs the full time, let it roast through the range rather than pulling it while the centers are still firm. The finished sprouts should have browned patches outside and a soft, cooked center.
Two Useful Ways to Adapt the Tray
Make a meatless tray
Leave out the bacon and roast the seasoned sprouts with the olive oil. The result is vegetarian and lets the sprouts’ nutty, cabbage-like flavor come through more clearly, though you won’t get bacon’s smoky savor or crisp pieces. Keep the sprouts in one layer so they still have room to brown.
Use regular-cut bacon for a crisper, lighter bite
Swap in the same weight of regular-cut bacon, cut into pieces. The thinner pieces tend to crisp sooner and contribute less substantial bites than thick-cut bacon, so keep an eye on their color as the tray roasts. The sprouts remain the same; this change mainly affects the bacon’s texture.
Storage and Reheating
- Refrigerator: Store leftovers in a covered container for 3 to 4 days. The sprouts soften in the fridge, and the bacon loses some of its crispness.
- Freezer: You can freeze the cooked sprouts and bacon in an airtight container for up to 2 months, but thawed sprouts will be softer. Freeze them only if you don’t mind losing some of the freshly roasted texture.
- Reheating: Spread leftovers on a baking sheet and warm them in a 425°F oven until hot throughout. A microwave is quicker but softens the sprouts and bacon instead of bringing their edges back.
Questions That Come Up When Roasting Brussels Sprouts with Bacon
Crispy Bacon Brussels Sprouts
Ingredients
Equipment
Method
- Heat the oven to 425°F.
- On an 18x13-inch rimmed baking sheet, toss the Brussels sprouts with the olive oil, kosher salt, and black pepper, then arrange them cut sides down.
- Scatter the bacon pieces among the sprouts in a single layer.
- Roast for 25 to 30 minutes, stirring once after 15 minutes, until the sprouts are tender with browned edges and the bacon is crisp.